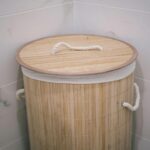
I’ll show you how to make a fabric storage pouch for toilet paper rolls. Measure your roll’s circumference, double it, then add 6 inches for length—about 36 inches total. Cut two fabric pieces 36 by 6.25 inches, sew them right sides together leaving a 4-inch opening, then turn it inside out and top-stitch closed. Attach two 26-inch tie strips to hang it below your dispenser. Match your fabric to your bathroom colors, and consider wrapping rolls in patterned paper for extra style. There are many ways you can customize this storage solution to suit your preferences.
Measure and Cut Your Fabric Pieces

How do you know what size fabric to cut? I’ll walk you through the measurement process for making toilet paper holders that actually fit your rolls.
First, measure your toilet paper roll’s circumference. Double that number, then add 6 inches for your length measurement. Next, measure the roll’s width and add 2 inches for your width measurement.
For most standard rolls, you’ll get approximately 36 inches long by 6.25 inches wide fabric pieces. You’ll need two pieces total to form your main panel.
Before cutting, consider using interfacing if your fabric feels lightweight. It adds stiffness and improves structure. Lay out your fabric, mark your measurements carefully with a pencil, then cut both pieces. You’re now ready for the next step.
Sew the Main Storage Pouch Together

With your fabric pieces cut and ready, you’re set to start assembling your pouch. Place the two pieces right sides together and sew almost all the way around, leaving a 4-inch opening for turning. This opening will let you flip your pouch right side out later.
Next, clip the corners at angles to reduce bulk without cutting through your stitches. This step prevents lumpy corners that would look sloppy around your toilet paper rolls.
Turn the pouch right side out through that opening and press it flat with your iron. Fold the opening edges inward and iron them to create a neat seam. Finally, top-stitch around the entire edge to secure the opening and finish your storage pouch with a professional appearance.
Create and Attach the Tie Strips

Now I’ll cut two 26 by 1 inch strips from your fabric and fold them lengthwise, then press them with an iron to create neat, finished edges that look like bias tape. Once I’ve folded and pressed these strips, I’ll sew along the edges to close them up and form sturdy ties that’ll hold your storage pouch securely to the toilet paper dispenser.
Cutting Fabric Strips
The tie strips are what’ll let you hang your toilet paper holder wherever you want, so let’s get them ready. I measure and cut two long strips from my fabric, each one 26 inches by 1 inch. These strips become the ties that hold your toilet paper holder securely in place.
Next, I fold each strip lengthwise and press it with an iron to create crisp edges. Then I fold the raw edges inward, making bias-like strips that look finished and professional. I iron these folds flat so everything stays neat.
This preparation step prevents fraying and gives your toilet paper holder a polished appearance. Taking time now to fold and iron properly means your ties will last longer and look better when you’re hanging your storage solution.
Folding And Pressing
Once you’ve cut your two 26 by 1 inch fabric strips, it’s time to fold and press them into finished ties.
Here’s how to create your fabric storage ties:
- Fold each strip lengthwise, bringing the long edges together
- Press with an iron to create a sharp crease down the middle
- Fold the raw edges inward and press again for a clean finish
- Sew near both edges to close the strips securely
- Press one final time for a polished appearance
These finished ties will attach to your storage container’s sides. The pressing step matters—it makes your ties look professional and helps them hold their shape. You’re creating functional pieces that’ll keep your decorative toilet paper organizer looking neat. Take your time with the ironing, and you’ll get crisp, attractive ties that complement your fabric storage project well.
Sewing Ties Closed
Ready to turn those fabric strips into functional ties? Now we’ll sew them closed to create neat, finished strips. Take one fabric strip and fold it lengthwise with the right sides facing together. Sew along the long edge using a straight stitch, staying about a quarter inch from the edge. Leave one short end open for turning. Repeat this process with your second fabric strip. Once both strips are sewn, carefully turn them right-side out through the open ends. Use a point turner or pencil to push out the corners neatly. Press each strip flat with your iron. Sew the open ends shut using a ladder stitch or whip stitch for an invisible finish. You’ll now have two polished fabric ties ready for attachment.
Hang Your Holder Below the Dispenser

Want to maximize your bathroom storage without cluttering the walls? I’ll show you how to hang your toilet paper holder below the dispenser for convenient access.
Here’s what makes this placement work so well:
- Uses your existing dispenser as an anchor point
- Keeps extra rolls within arm’s reach
- Maintains a clean, organized bathroom appearance
- Prevents rolls from getting dusty or damaged
- Creates a functional storage solution
Simply slip your finished holder onto the rod below your current roll. The fabric hangs naturally, displaying your decorative design while holding supplies. If you used lighter fabric, the optional interfacing helps it maintain its shape. Your toilet paper holder now serves double duty—storing extras while adding style. This placement keeps everything accessible and organized exactly where you need it most.
Choose Fabrics That Match Your Bathroom

When you’re picking fabric for your toilet paper holder, match it to your bathroom’s existing colors and patterns—think about what your towels, shower curtain, or wall color already are. Test how your chosen pattern looks at the actual size you’ll use (around 36 inches by 6.25 inches) so the design repeats look balanced and don’t feel cramped or stretched out. Pick water-resistant or tightly woven fabrics so moisture and mildew don’t ruin your project over time.
Color Coordination Tips
Three key things matter when picking fabrics for your toilet paper storage: matching your bathroom’s existing colors, choosing the right fabric family, and keeping the overall look balanced.
I’ve found that coordinating fabric with your bathroom’s tone creates a cohesive appearance. Here’s what I focus on:
- Cool-toned bathrooms (blues, greens): I pick gray or teal fabrics
- Warm-toned bathrooms (beige, terracotta): I choose cream, gold, or rust fabrics
- Small patterns or microtextures: These prevent visual clutter in tight spaces
- Solid neutrals: Perfect for calm, understated looks
- Bold patterns: Ideal for creating bathroom accent pieces
I align my fabric’s dominant color with existing fixtures like your toilet or soap dispenser. This creates a unified appearance throughout your space. Using one coordinating fabric family keeps everything coordinated and organized-looking.
Fabric Pattern Selection
How you pick your fabric pattern affects how your storage looks in the space. Fabric pattern balance is important when selecting designs for your toilet paper holder.
Small prints work well if you’re making a compact storage unit. They won’t overwhelm the piece. Large patterns can dominate bigger installations and create visual interest.
Match your pattern to your bathroom’s existing décor. If you’ve got neutral walls, try small geometric prints or subtle florals. When your bathroom’s already colorful, stick with solid fabrics or minimal patterns.
Consider the scale carefully. Measure your storage dimensions first. Then hold fabric samples against your bathroom walls. This shows you how the pattern actually looks in your space. You’ll make a choice that works for your room.
Simple Alternatives Using Household Items

You’ve probably got most of what you need to create clever toilet paper storage without spending much money. I’ve found several household items work well for organizing rolls while keeping your space looking neat.
Here’s what I use:
- Mesh bags hung on hooks to hold multiple rolls
- PVC pipe storage with small segments attached to walls using double-sided tape
- Fabric sling holders sewn from strips and tied around wooden dowels
- Repurposed spool racks with upright pegs for roll storage
- Hanging baskets mounted with command hooks
Each option lets you customize storage to match your bathroom style. PVC pipe storage works great if you want a minimalist look—just measure your roll thickness and cut accordingly. These solutions keep rolls accessible while freeing up floor space, and they cost less than buying decorative holders.
Add Decorative Touches With Patterned Wrapping

I’ll show you how to create stylish bathroom accents using patterned wrapping paper on plain rolls. Select materials that withstand humidity, apply patterns to avoid bulky seams, and arrange them intentionally to complement your décor. You’ll learn which wrapping papers perform best in moist bathroom environments, the proper technique for neat wrapping, and how to display rolls so they coordinate with your existing design. These methods allow you to change designs seasonally or match your current color scheme with minimal hassle.
Selecting Your Wrapping Paper
The wrapping paper you choose affects how your toilet paper storage looks and holds up over time. You’ll want to pick paper that works well in your bathroom’s humid environment while matching your décor.
Consider these key factors when selecting wrapping paper:
- Moisture-resistant finish or clear laminate coating for protection
- Patterns that align with the roll width for visibility
- Colors coordinating with existing bathroom fixtures and fabrics
- Repeating motifs for a unified, polished appearance
- Durable material that won’t tear easily during application
Check the paper’s thickness and water-resistance rating before purchasing. Thicker papers generally hold up better in steamy bathrooms. Match your wrapping paper to towels or shower curtains you already own for cohesion.
Applying Decorative Patterns
Once you’ve picked out your wrapping paper, it’s time to add decorative patterns to your rolls. I like to use tissue paper, contact paper, or fabric wraps with repeating motifs like stripes, florals, or geometric designs. These wraps add visual interest without adding bulk to your storage.
Here’s how I apply them: 1) Measure your wrapping material around the roll. 2) Cut it to size, leaving a small overlap. 3) Secure the wraps using clear adhesive, double-sided tape, or light glue.
Choose water-resistant patterns that you can easily wipe clean since bathrooms get humid. For a coordinated look, I repeat the same color palette across all my wrapped rolls and pair them with matching storage baskets. This creates a polished, organized display for your bathroom.
Styling Open Storage Displays
By wrapping your toilet paper rolls in colored or patterned tissue paper, you can create decorative elements for your bathroom storage. Styling open storage displays with wrapped rolls adds visual interest to the room.
Here’s how to arrange DIY decorative toilet paper storage:
- Match tissue paper colors to your bathroom’s existing palette
- Use consistent patterns like stripes or florals across multiple rolls for visual unity
- Wrap each roll snugly without crushing it to maintain easy accessibility
- Display wrapped rolls on open shelves or in baskets
- Layer different pattern scales for added visual interest and depth
This approach turns functional storage into an attractive display. Your wrapped rolls become part of your bathroom’s design rather than hidden away.
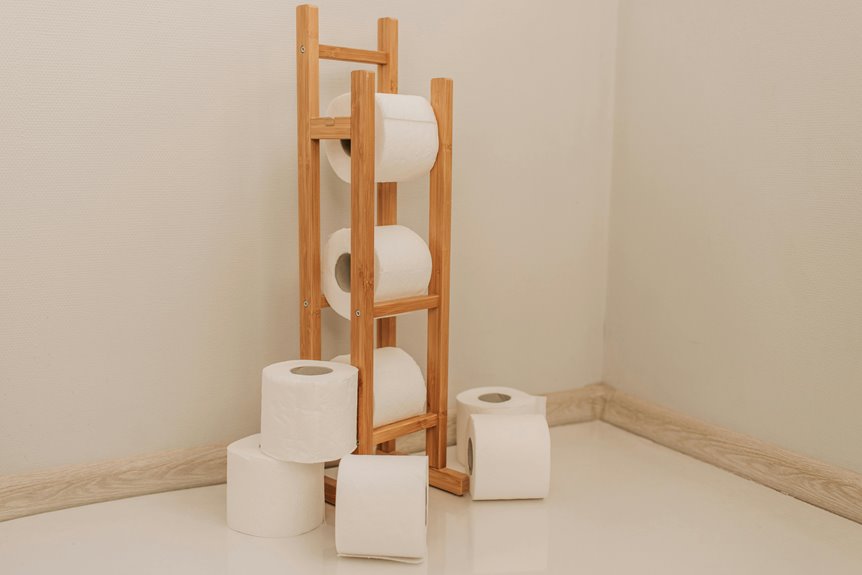
Store Multiple Rolls With Vertical Solutions

If you’ve got limited floor space in your bathroom, vertical storage is your best friend for keeping multiple toilet paper rolls organized and accessible. I recommend using tall, slim holders like mesh bags or tension-rod stacks that let you pile several rolls in one narrow column. You can also repurpose a spool rack or mounted magazine holder for this purpose. For a DIY approach, I create fabric slings that hang below your existing dispenser, holding multiple toilet paper rolls vertically in sequence. The key is securing the top of your vertical holder firmly to the wall or toilet area. This prevents tipping and sagging while you grab rolls from below. This method frees up valuable floor space in smaller bathrooms.
Customize the Sizing for Your Space

How do you know what size fabric pieces you’ll actually need for your DIY toilet paper sling?
Start by measuring your toilet paper roll’s circumference, then double that measurement and add 6 inches for the length. For width, measure your roll’s width and add 2 inches. This approach lets you customize your storage to fit your specific space.
Measure your toilet paper roll’s circumference, double it, add 6 inches for length, then add 2 inches to the width for a custom fit.
What you’ll need to gather:
- A standard measuring tape
- Your toilet paper roll dimensions
- A calculator for quick math
- Fabric pieces cut to size
- Optional interfacing material for adjusting stiffness
Following these calculations, you’ll typically end up with fabric pieces around 36 inches by 6.25 inches. Cut two pieces using these measurements. Consider your fabric type and whether you want interfacing to adjust the final stiffness and fit.
Keep Your Holder Stocked and Functional

The key to a functional DIY toilet paper holder is designing it so you can easily swap out rolls without taking the whole thing apart. I recommend using elastic straps or tension rods that let you load fresh rolls quickly. Add a clear opening or top seam so you’ll spot when supplies run low. Size your slots to fit standard rolls—roughly 36 inches by 6.25 inches for a two-roll-wide toilet paper holder works well. Include an extra pocket or dedicated space for spare rolls. This redundancy means you’ll never frantically search for backup during busy times. By building in these practical features, you’ll create a holder that stays stocked and functions smoothly for everyone in your household.